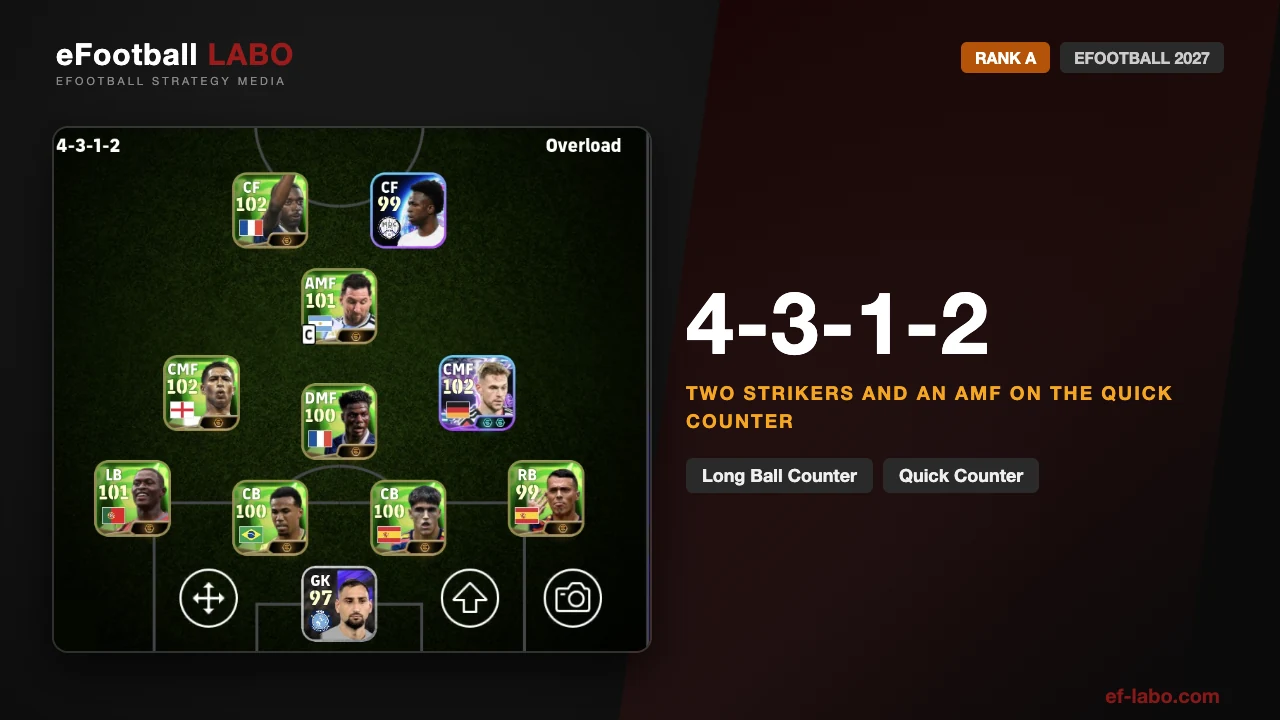
- Rank A. Tested so far in Division 2.
- Two CFs and an AMF break the middle in two or three passes. Few players, few touches.
- Only three attack, so a side that sits in will hold you — and a broken-down move becomes a counter.
The 4-3-1-2 attacks through the middle with two CFs and an AMF, and it does it in as few passes as possible. Behind them sits a proper block — a back four with three midfielders in front. You defend with seven and finish with three, so the three have to be good and the moves have to be quick.
4-3-1-2: overview
| Rank | ATested in Division 2 |
|---|---|
| In one line | Two CFs and an AMF breaking the middle in as few passes as possible |
| Biggest weapon | The central break: three players close together, finishing moves on their own |
| Biggest weakness | Being hit on the long counter when the attack breaks down |
| Suits you if | You like breaking through the centre, or playing on the counter |
| Not for you if | You want strong wingers, or you want to keep the ball |
| Team Playstyle | Long Ball Counter / Quick Counter |
Rank A. Ranks come from how a formation holds up as we take it up the divisions — this one won two, drew two and lost one of five games in Division 2 — a provisional record, and the rank will move once there is more of it.
What it does well, and where it hurts
- Two CFs and the AMF stand close enough to finish a move between the three of them — no build-up needed.
- Behind them, a back four and three midfielders is a solid block.
- Push the full-backs on and you get goals from wide as well, which two strikers are well set up to attack.
- Three attackers means you struggle to break down a side that sits in.
- Push a full-back on and the space behind is open to the counter.
- Fail to finish a move and the long counter comes straight back at you.
The shape
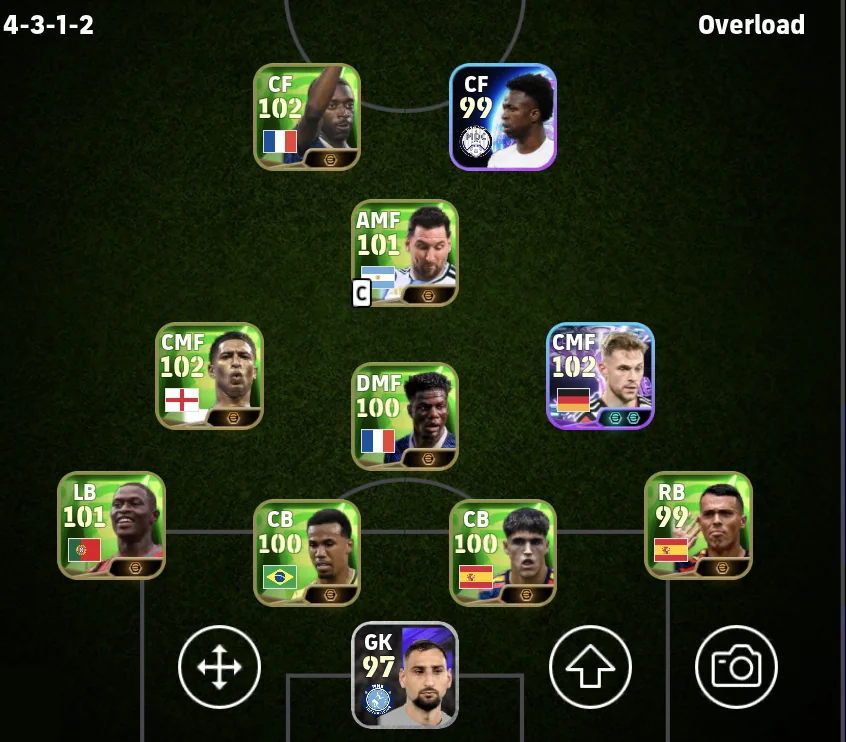
4-3-1-2: a back four, a DMF with two CMFs, an AMF and two CFs.
A back four, then one DMF with two CMFs in front of it, an AMF, and two CFs. Seven players defend and three attack — that split is why the block is solid and why the attack has to be sharp.
How to attack
Everything happens between the two CFs and the AMF. Win the ball and go straight to them; three players standing that close can finish a move without anyone else. The fewer touches you take, the less time their defence has.
Quick Counter: the CF breaking the line
The move the shape is built on. Three players within a few yards, one-touch between them, and the one who plays the pass is the one who runs.
- Win it and give it to the AMF
- The AMF plays it into a CF
- That CF lays it off first time to the other CF
- The first CF spins in behind
- The through ball goes in and that CF finishes
Through the middle: the AMF arriving from deep
The second option. Hold the ball up instead of laying it off, and the run comes from behind rather than from the front.
- The AMF plays a vertical pass into a CF, who holds it up
- The AMF runs past that CF from deep
- That CF slides the through ball in
- The AMF finishes
Out Wide: getting the full-back forward
The answer when the middle is shut. Two strikers is a good number to aim a cross at.
- The AMF works it out to the RB
- The RB carries it down the right
- From out there the RB puts a cross in
- A CF heads it in
Building up
There is not much build-up in this shape — you win it and you go. What you do need is a way out for when they defend deep and the middle is shut, because the alternative is forcing a pass into a crowd.
Out to the side when the middle is closed
Not the plan, but the way out when it is needed. The full-back is your only real supply line to the flank.
- The DMF gets on the ball and finds a CMF
- That CMF moves it out to the RB
- The RB carries it forward
Mistakes people make, and the fix
You get countered through the space behind an attacking full-back
| Why it happens | What to do |
|---|---|
| The cross does not come off, they pick it up, and the space that full-back left is the first place they go. | If the cross is not on, turn back and go again rather than putting it in and hoping. Against a side with real wingers, keep the full-backs at home from the start. |
You rush the counter and lose it in midfield
| Why it happens | What to do |
|---|---|
| You win it, look forward immediately, and force a vertical pass that gets read. | If no one is near you, carry it instead. If they are on you, keep it or go long — there is no rule that says every turnover has to become a counter. |
How to defend with it
You have accepted that only three players attack, so the seven behind them defend properly. The two places it goes wrong are the space behind an attacking full-back, and the DMF drifting forward.
| Area | What to do |
|---|---|
| Midfield | Use defensive-minded players at the base of midfield. Winning it there is what starts the Quick Counter, and you are not asking those three to create. |
| Wide | The space behind a full-back is the hole. Quick CBs cover it. Against a side with numbers on the break, use defensive full-backs from the start rather than fixing it later. |
| The DMF | Holds position and does not join the attack. That one player staying is what keeps the block from splitting when you lose the ball high up. |
| When ahead | Set both full-backs and both CMFs to Defensive in Individual Instructions. You do not need to change shape — the block is already there. |
Players and playing styles that fit
The playing style matters more than the overall rating here. These are the ones the shape actually asks for.
| Position | Playing Style | Why |
|---|---|---|
| CF (the runner) | Goal Poacher | Getting in behind is the move. This one is not optional. |
| CF (the other) | Dummy Runner | Pulls a defender away and runs off the other CF. The pair have to work as a pair, not as two finishers. |
| AMF | Hole Player | Plays the vertical pass and arrives late. The link between the block and the attack. |
| CMFs (both) | Box To Box | Up and down all game. They win it back and they get forward. |
| DMF | Anchor Man | Stays in front of the back four. Defending is the whole job. |
| Full-backs | Offensive Wingback | Your only width. Swap to defensive ones when the opposition has wingers worth worrying about. |
| CBs | Build Up, and quick | Pace to cover behind the full-backs, and good enough on the ball to start the counter. |
Best managers for this formation
4-3-1-2 runs on Long Ball Counter and Quick Counter, so what you want is a manager with high proficiency in those. Every manager below is rank SS on eFootball LABO — high proficiency, a booster and a link-up — picked for their proficiency in these playstyles.
Best managers for Long Ball Counter





Best managers for Quick Counter





Go straight to the three in the middle and finish it there. Do not force the counter when it is not on. Full-backs and CMFs on Defensive when you are ahead.
Matchups
| Opponent | Matchup | Why, and what to do |
|---|---|---|
| Sides that push their full-backs on | Good | Their back line is stretched, and two strikers running in behind is exactly what you have. |
| Sides that sit in a deep block | Even | Three attackers against a packed defence is hard work, and you are not built to keep the ball and wait. Getting the full-back forward is your way in. |
| Sides with numbers on the counter | Poor | Your full-back has gone, and that is the space they want. Keep them at home from the start rather than reacting after the first goal. |
Matchups are provisional and come from played matches. We update them as we play more.
FAQ
Is 4-3-1-2 good in eFootball?
What Team Playstyle should I use with 4-3-1-2?
What is the weakness of 4-3-1-2?
How do I actually score with 4-3-1-2?
What should I do when I am ahead?
Summary
- The spine of it is seven defending and three attacking. The three break the middle in two or three passes, which is what makes the shape dangerous.
- The price is no width except the full-backs, and no answer to a deep block. Push a full-back on when the middle is shut, and aim the cross at two strikers.
- Do not force the counter when it is not on. That, and the space behind an attacking full-back, is where the goals against come from.